
How to Create a Tech Pack - Step-by-Step Guide
Are you just starting your own clothing brand? But you don't understand what a Techpack is or how to create one? No panic! I got you!
In this blog post, I will guide you step by step through the process of creating a tech pack.
Towards the end, you'll find a free tech pack template where you just need to input your product information.
Summary
- • What is a Techpack?
- • Reasons why you need a Techpack
- • What should be included in a Techpack?
- 1. Introduction
- 2. Size Chart
- 3. Printing Information
- 4. Care Label and Label Informationen
- 5. Reference Pictures and Why You Should Use Them
- 6. How to correctly specify colors in your Techpack
- • Conclusion
What is a tech pack?
The Technical Package, or tech pack for short, is the foundation for starting your textile production. A tech pack contains all the essential information that a production needs to provide you with quote or to start your production.
Therefore, a tech pack covers all the important details such as fabric type, wash, colors, dimensions, printing techniques, etc., of your product. So, a tech pack is a blueprint for starting your clothing production.
Why you need a Tech Pack
Especially in the production of complex products like textiles, communication between you and your production is crucial. Otherwise, misunderstandings can cost you a lot of money. Without a tech pack, your production cannot provide you with information on whether they can manufacture your product, how long it will take, and at what unit price production is possible.
How to find clothing manufacturers
Are you just starting your fashion brand but still looking for the right production? On suplify, you will find more than 500 producers from Portugal, Turkey, Italy, and Germany.
What Should Be Included in a Tech Pack?
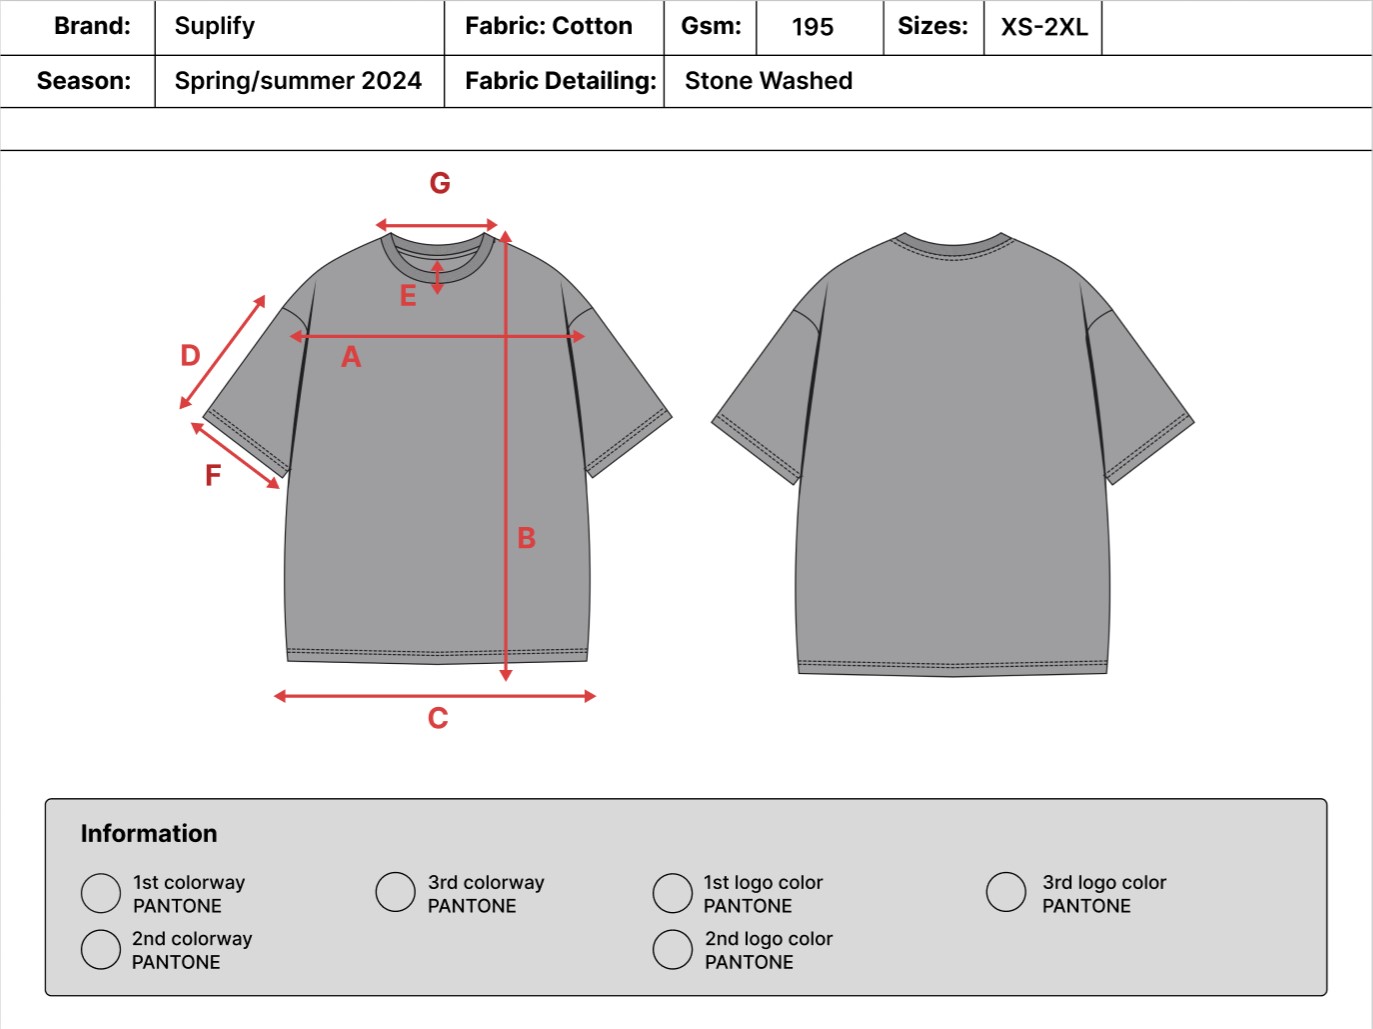
1. Introduction
At the beginning of your production file, you should give the production a clear idea of how your product should look like. You do this with the help of a mockup of your product. You can create such mockups yourself using programs like Adobe Illustrator. You can also make this process easier by using ready-made mockups from marketplaces like Etsy. Afterward, you can customize them according to your preferences. In addition, in the header of the first page, you should address the following points:
- 1. Your brand name
- 2. Season (e.g., Spring/Summer 2024)
- 3. Fabric composition (e.g., 100% cotton)
- 4. Colorways
- 5. Wash (e.g., Stonewash)
- 6. Sizes (e.g., XS-2XL)
- 7. Fabric weight (e.g., 195 gsm)
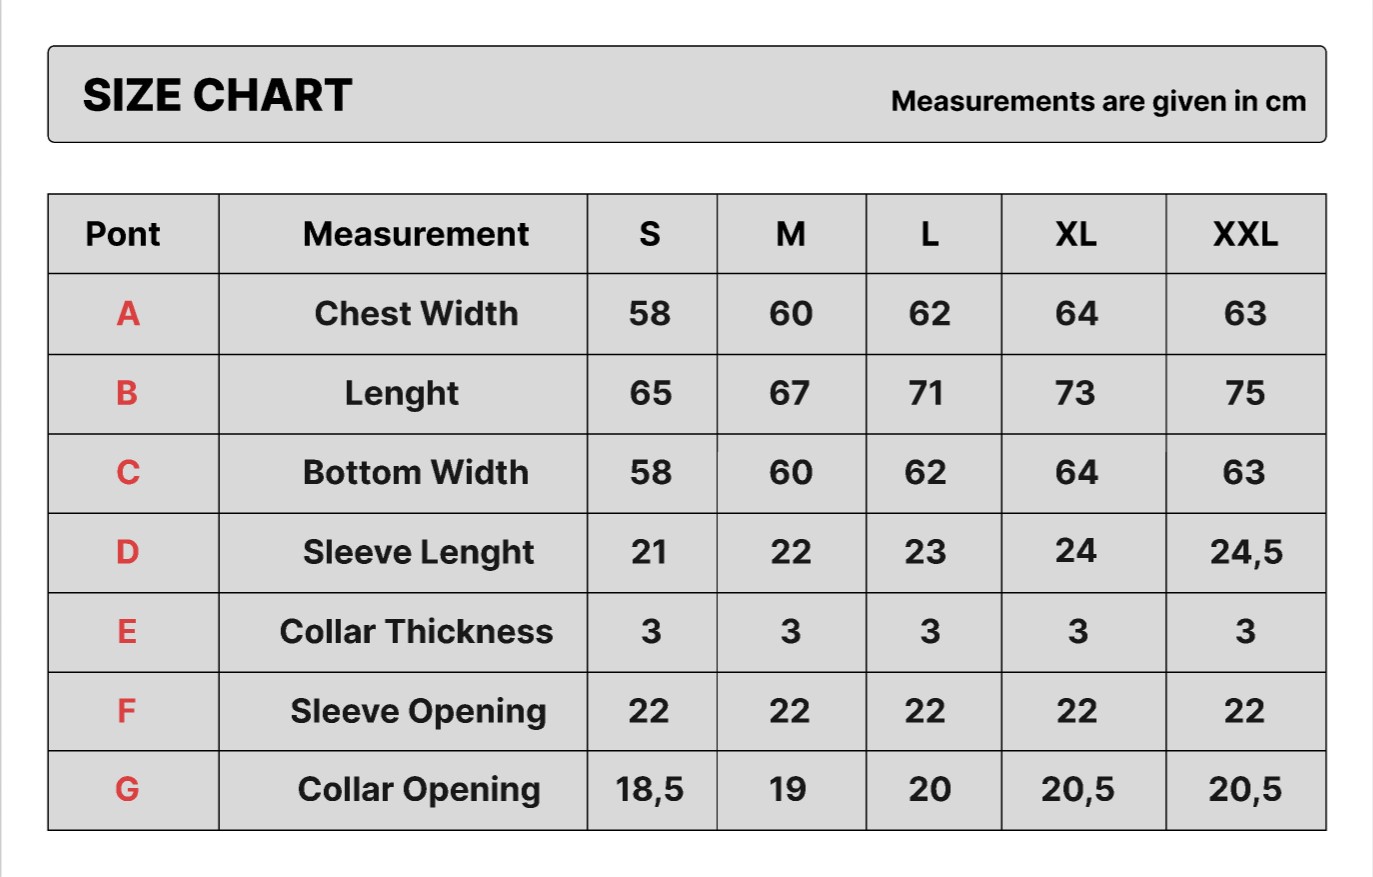
2. Size Chart
Especially when working with your own patterns, it is extremely important to create a size chart. In a size chart, you present all the important measurements of your product.
It is important to make sure that you provide the correct measurements for all different sizes. As you probably know, the sleeve length of a T-shirt in XS is not the same as the sleeve length of a T-shirt in XL.
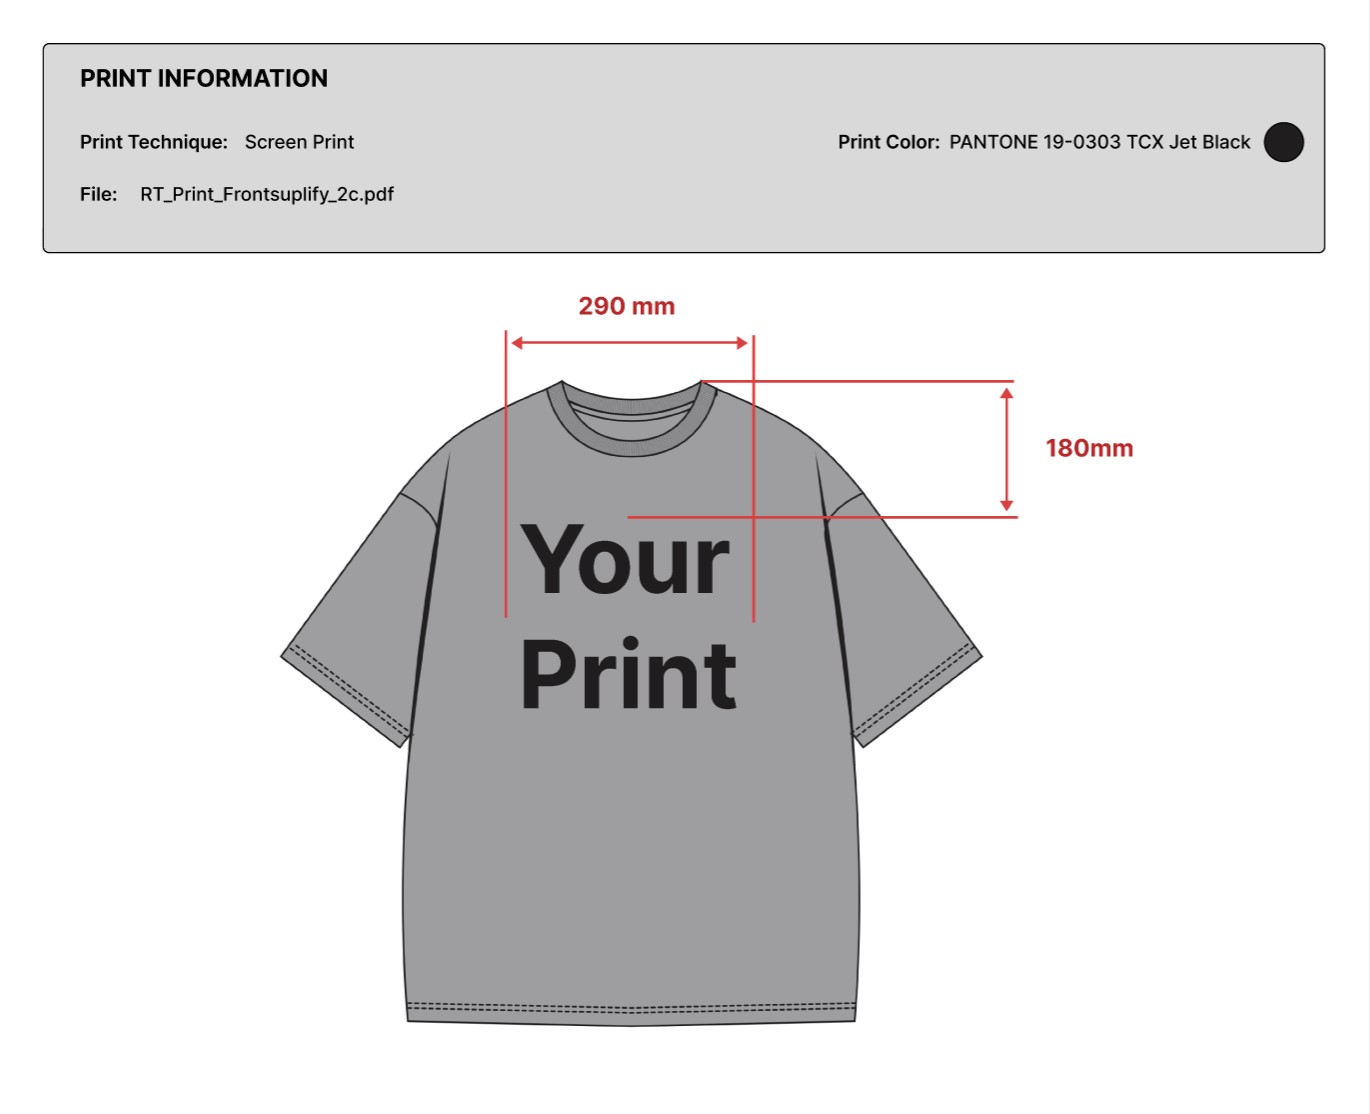
3. Printing Information
On this page, you provide the production with detailed information on how your product should be printed. In the header, you mention the desired printing technique/finishing technique (e.g., Screenprint) and the color or colors of the print. It is also extremly important to tell the name of your print file to avoid misunderstandings.
Note! Remember to vectorize your print file. This is especially important for the following reasons:
1. Vector graphics ensure clear and sharp prints.
2. Colors remain constant and precise when printing with vector graphics.
You can vectorize your design in a few steps using Adobe Illustrator.
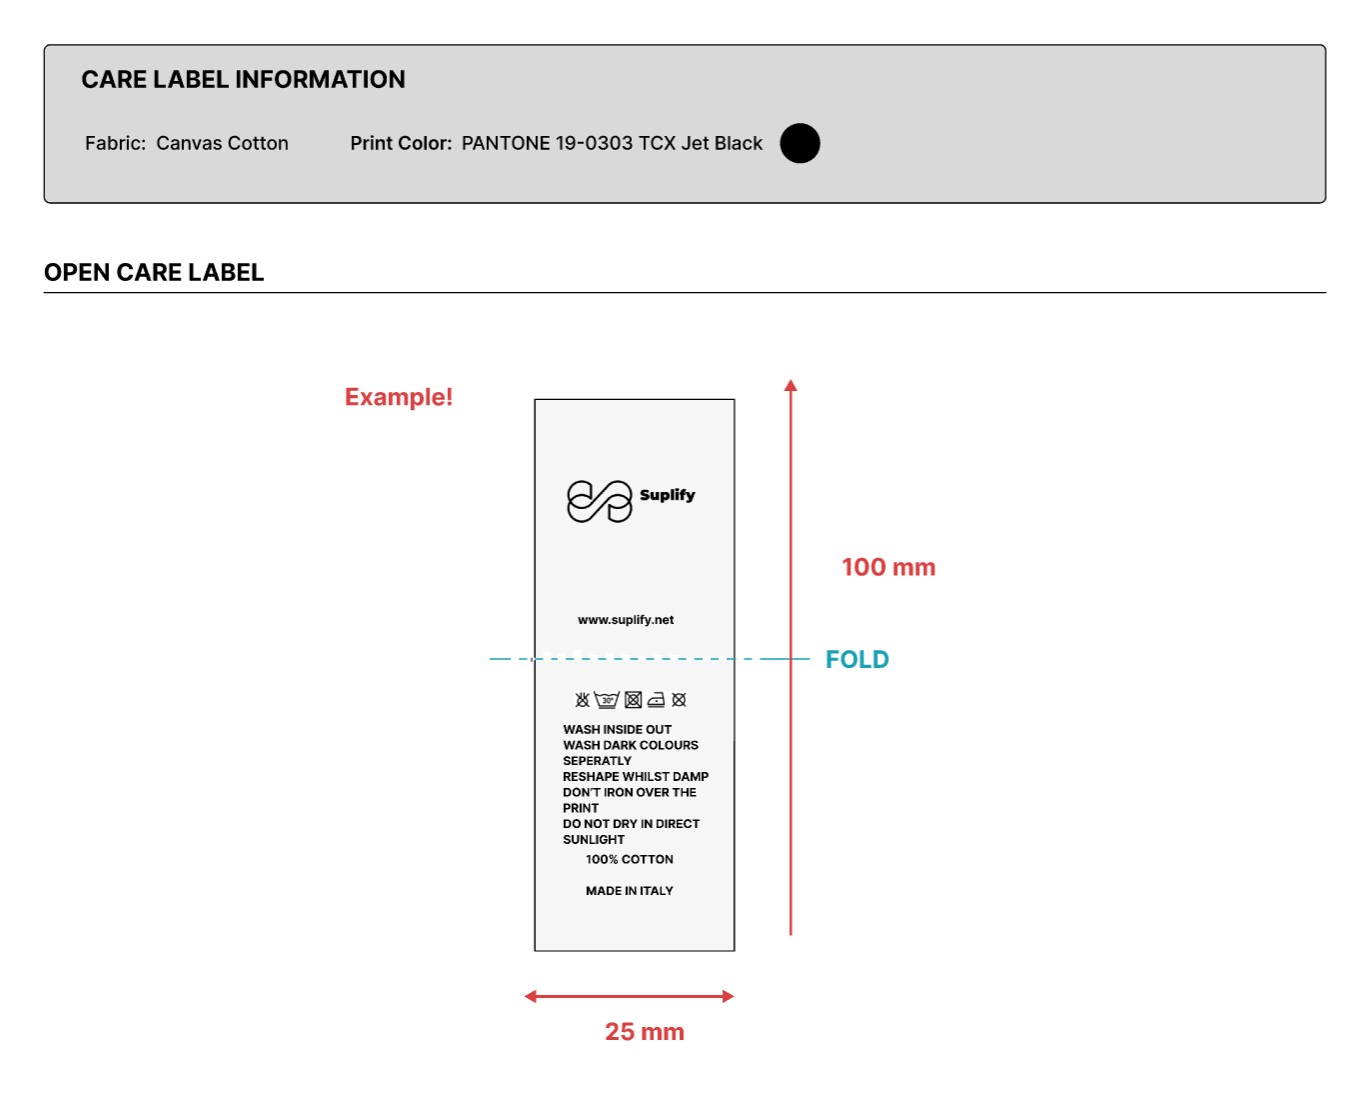
4. Care Label and Label Information
On these pages, you tell the manufacturer how your labels should look like. For example, you need a care label that provides customers with more detailed information about the origin, care, and fabric composition of your product. Therefore, it is important to show your production what should be on your care label. Furthermore, it also makes sense to provide information about the measurements of the care label. You should also mention the fabric and the the color it should be printed in.
You may also need additional labels on your product, such as an inseam loop label, which display your logo and brand name in the garment. To ensure that the manufacturer can precisely implement your label wishes, you must also provide precise information on cut, design, colors, etc.
5. Reference Pictures and Why You Should Use Them
To make it very clear to your manufacturer what the end result should look like, I recommend including reference pictures in your tech pack. For example, with the help of these images, you can effectively illustrate special printing techniques and cuts.
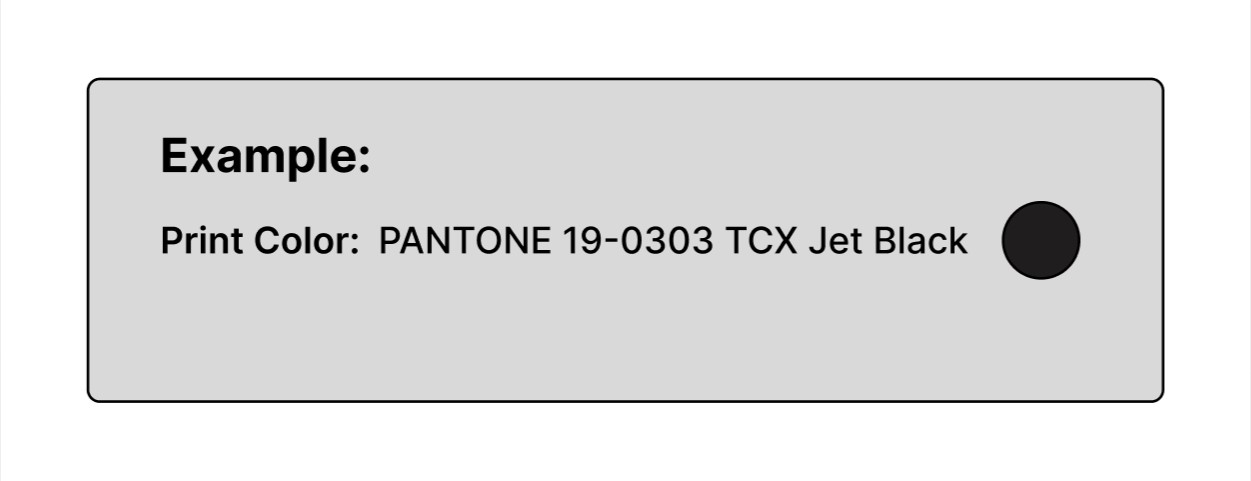
6. How to Properly Specify Colors on Your Tech Pack
When you're indicating colors for your tech pack, it's best not to just say 'dark red.' Instead, provide the Pantone code for each color and shade. Each color has its own Pantone code. When you use Pantone codes, you prevent a lot of possible confusion with your manufacturer. You can find lots of websites online that help you find the right Pantone code for the color you want.
Summary
Creating a tech pack is crucial for success or failure in production. Therefore, it makes sense to fully dedicate yourself to this process. Your production cannot read your mind, so leave no room for interpretation. Even if it takes a little time, I recommend addressing every detail so that your end product meets your expectations 100%!
Are you now looking for a shortcut to make tech pack creation easier? Then click here. On this page, you will find a tech pack template that you just need to fill in with your information. Furthermore, you will find an example tech pack on this page, which shows you exactly what a complete tech pack should look like.